
 Contact us


Frami Wall Formwork Installation Guide
This guide shows you how to set up the Doka Frami panel formwork system in a simple, typical layout. By way of example, we have chosen a straight reinforced concrete retaining wall, and the guide follows it from installing the first panel to taking the formwork down after the concrete has set. The panels are set up by hand, clamped together, tied through the wall with 15mm tie rods and braced with push-pull props.
Key Considerations
- Required Tools & Equipment
- Formwork hammer (max 800g) · push-pull props · release agent
- Panel Weights
- 19.5kg (1.20 × 0.30m) to 86.5kg (3.00 × 0.90m)
- Working Limits
- Wet concrete pressure up to 40kN/m² on stacked or 0.90m-wide panels
- Site Conditions
- A clean, level base · a secure fixing in the ground for each prop
Our Example: Building a Retaining Wall
Frami is modular, so no two Frami formwork setups are alike. This guide follows setting up Frami to pour a simple retaining wall as an example.
The wall in this example is 0.50m thick, and the concrete is poured 1.40m high in one continuous pour. It sits on a 100mm concrete kicker, which Step 1 explains. The formwork has two sides, called faces, one for each side of the wall. Each face is a single row of 0.90m-wide, 1.50m-high Frami panels, so the formwork stands 1.50m tall. Steel ties hold the two faces together through the wall, and push-pull props (also called plumbing props) hold one face upright.
The panel layout, tie positions and prop settings in this guide suit this example. On your own formwork setup they will depend on the wall height and thickness, the concrete used, the pour rate and any ground conditions. Under the Construction (Design and Management) Regulations 2015, any temporary structure, including formwork, must be designed to withstand the loads that can be foreseen on it. This is your responsibility to meet.
Installation Sequence
Step 1: Prepare the Panels and Set Out the Wall
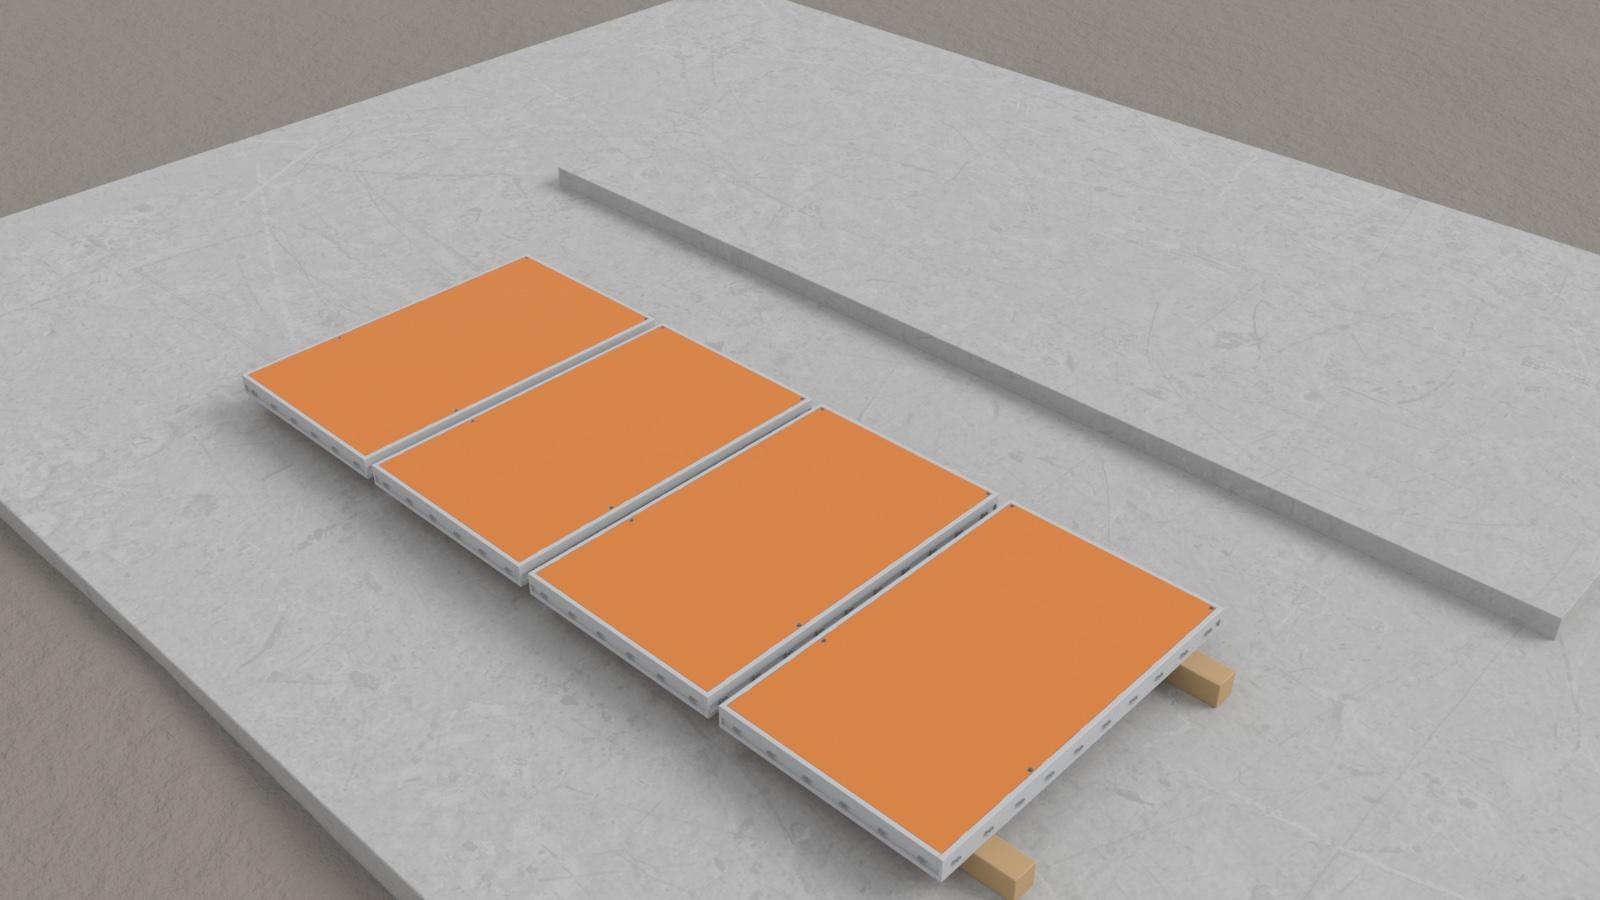
Check every panel, clamp and tie before use, and set aside anything damaged, bent or heavily worn.
Clean the surface the wall will stand on and mark out where each face of the wall will go. In this example the wall stands on a kicker, a short concrete upstand cast with the base that sets the position and thickness of the wall, so the panels stand against its sides. Where there is no kicker, mark the line of each face on the base instead.
Before every pour, coat the face and edges of each panel with release agent, such as mould oil, which stops the concrete sticking to the panels. Apply it in a very thin, even layer with no drips running down the face, because too much spoils the finish of the concrete. Keep it off the clamps and the parts of the frame they grip.
Step 2: Stand and Brace the First Panel
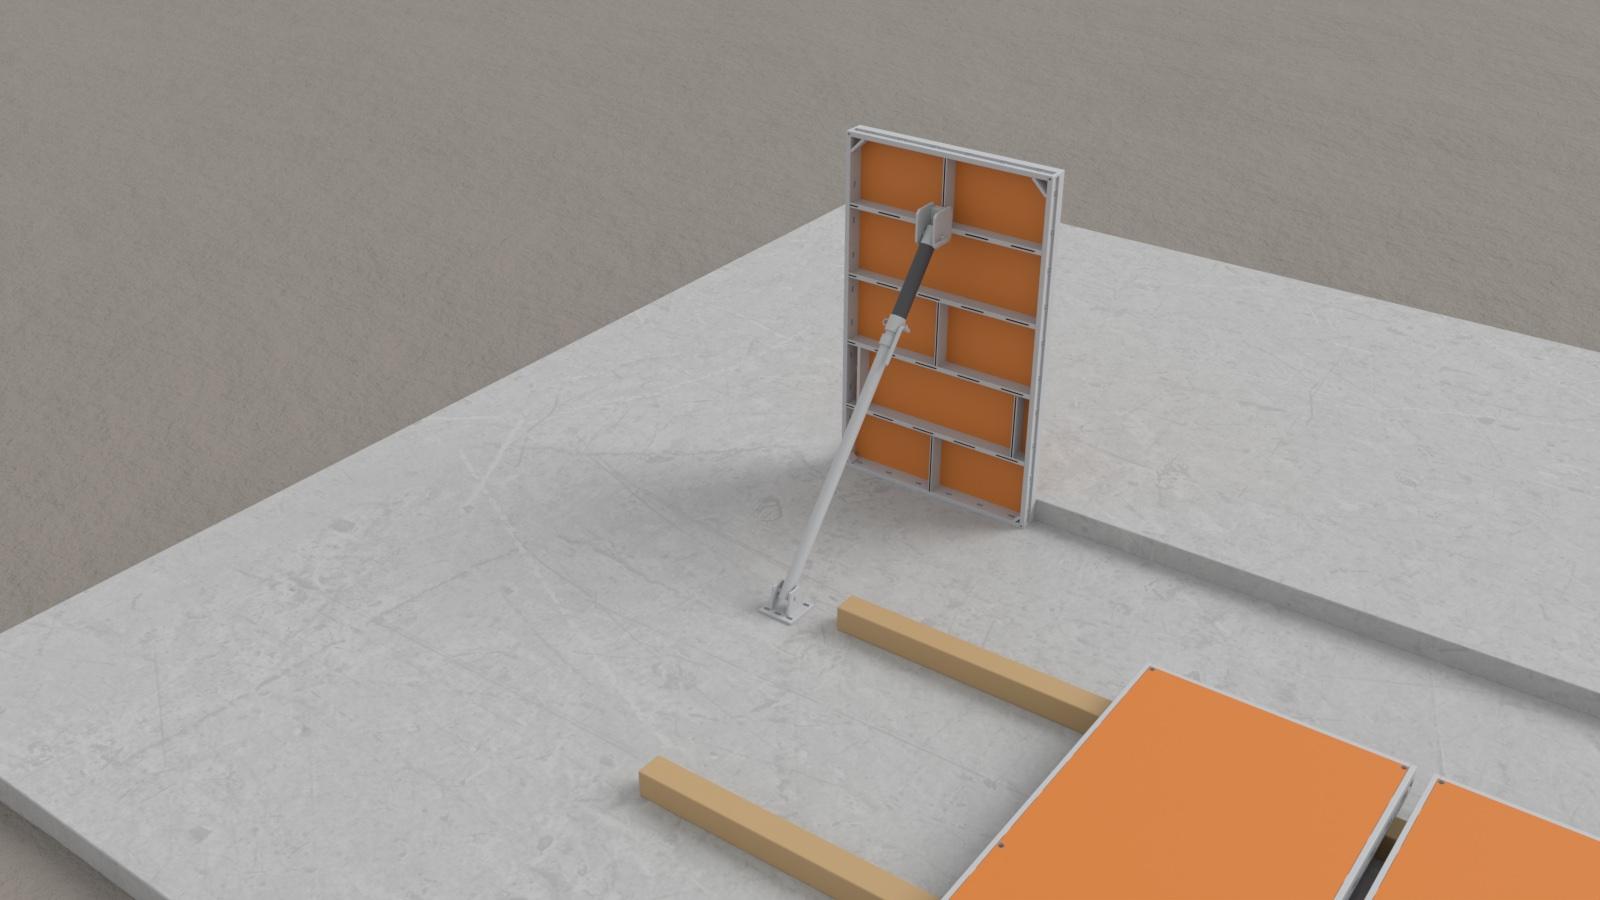
Start the first face at one end of the wall. Stand the first panel on the line you marked out and brace it with a prop straight away, so it can't fall over.
Connect the top of the prop to the panel frame with a Strut Head EB (the Doka fitting that joins a prop to a Frami panel) and fix the foot of the prop to the ground with a fixing that suits the ground conditions. Frami panels must stay propped at every stage of the work.
The number of props depends on the height of the formwork and how hard the wind can push against it, and Doka's tables give the maximum spacing between them for winds of up to 102km/h. In stronger winds, the number of props has to be worked out by calculation. Once panels are clamped side by side, each run of them needs at least two props, so it cannot twist.
Step 3: Line Up and Clamp the First Face
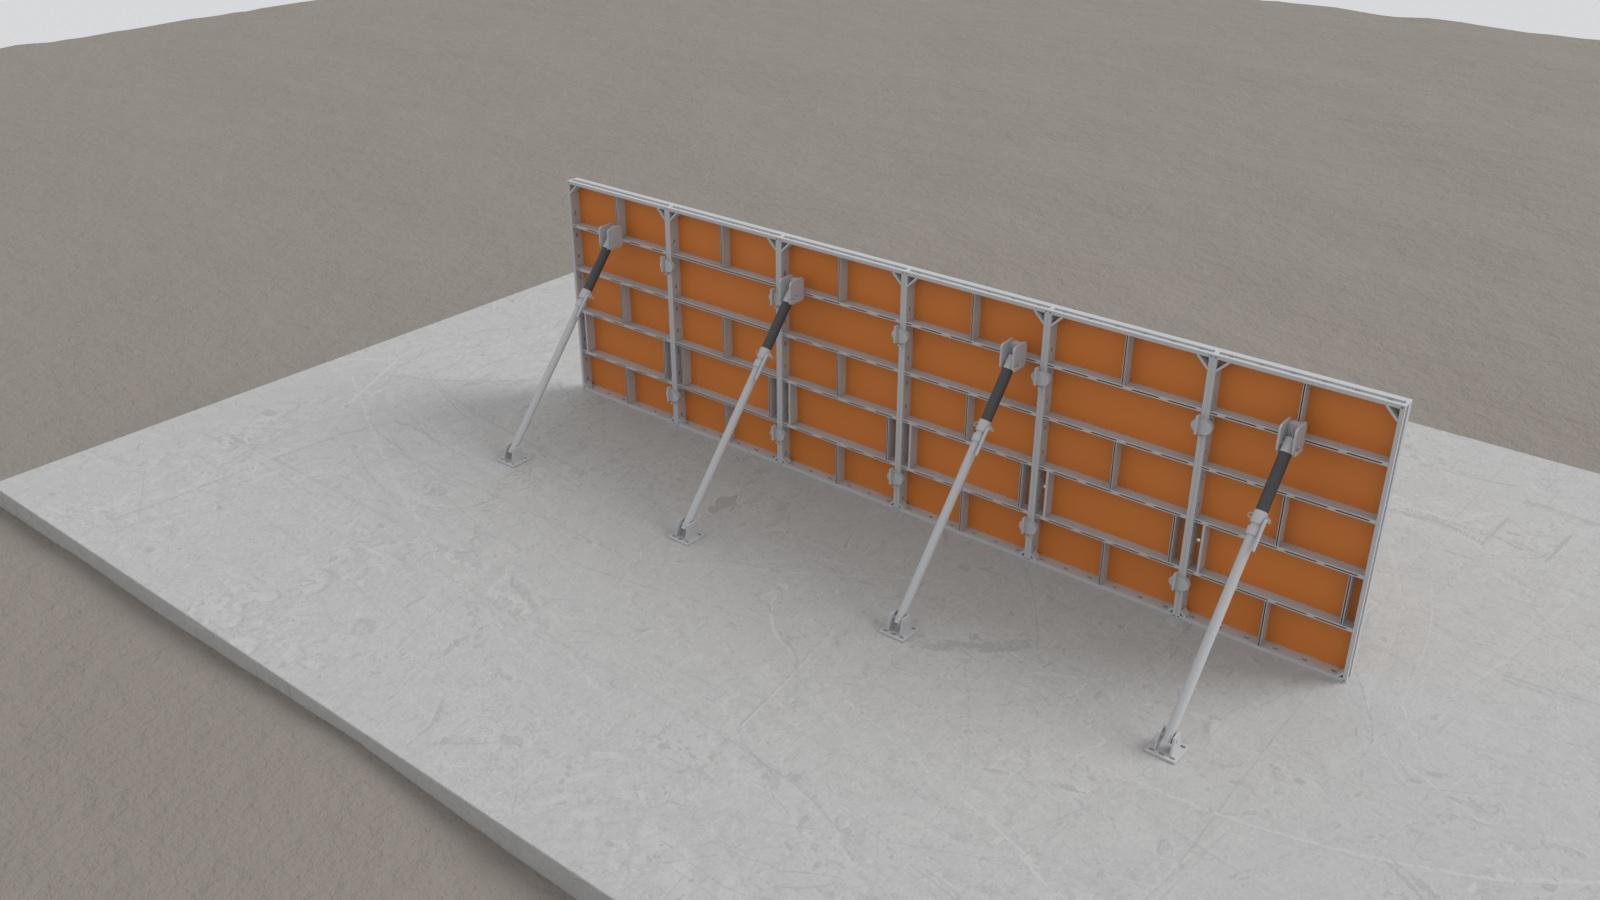
Stand the next panel beside the first and join the two with Frami clamps. You can fix a clamp anywhere along the slot in the panel frame, and you can tighten it with a formwork hammer of no more than 800g. Doka designs the clamps to be self-aligning, so tightening them should draw the two panels into line.
A vertical joint between two 1.50m panels standing upright needs two clamps. Continue along the wall, adding props at the spacing worked out for your wall.
Step 4: Plumb and Align the Formwork
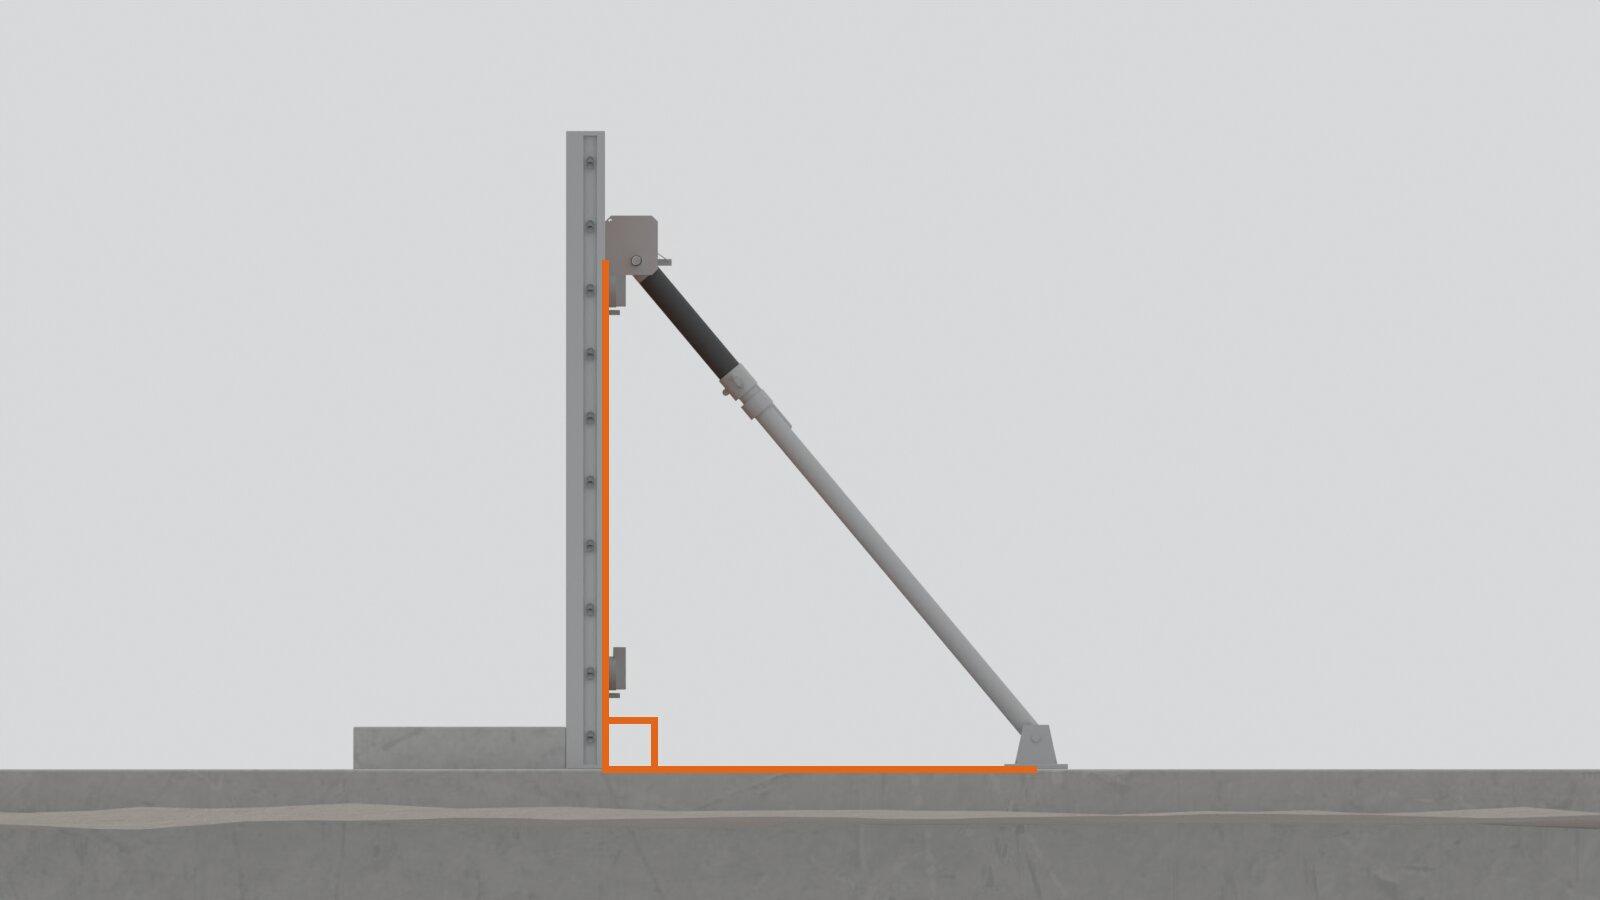
With the first face clamped together, lengthen or shorten the props until the whole face is exactly upright (plumb) and sits on the line you marked out. In our example, each prop is set at 50 degrees, connected 1.195m up the face and fixed to the ground 1.105m out from it. The angle and positions for your wall may be different.
Use only proper aligning tools. Never strike the panels with a sledgehammer, which damages the panel frames.
Step 5: Fix the Reinforcement
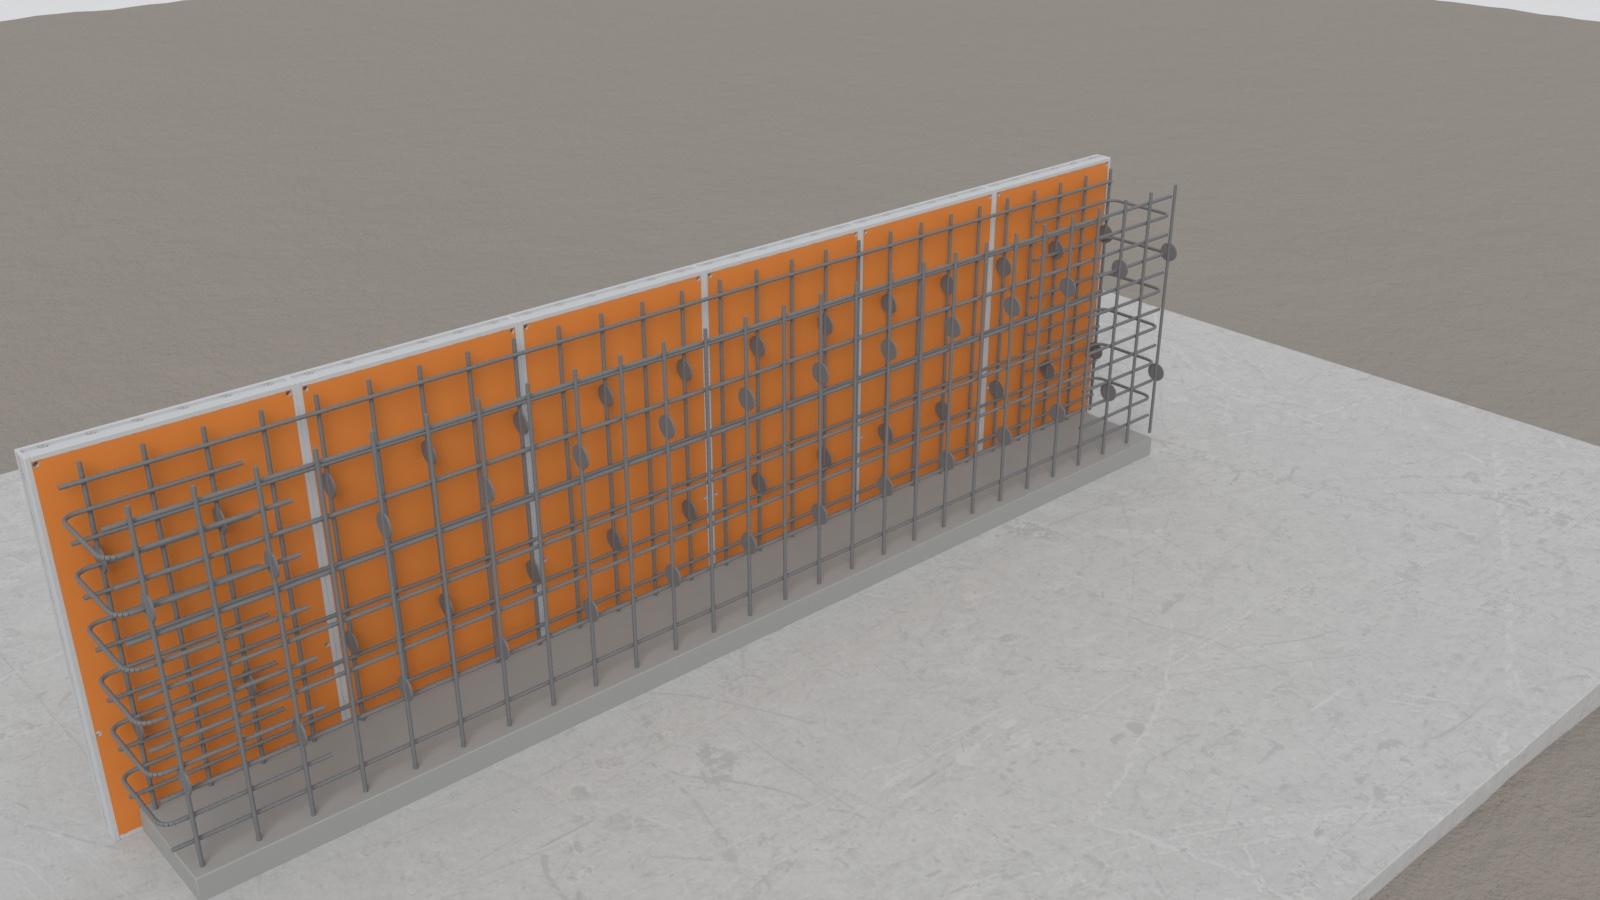
With the first face propped and upright, fix the steel reinforcement (rebar) for the wall in place, with spacers holding it off the panel face so the concrete can cover the steel. Any items to be cast into the wall, such as pipes or ducts, should also go in at this stage, before the second face closes the wall.
Step 6: Erect the Second Face and Tie the Two Together
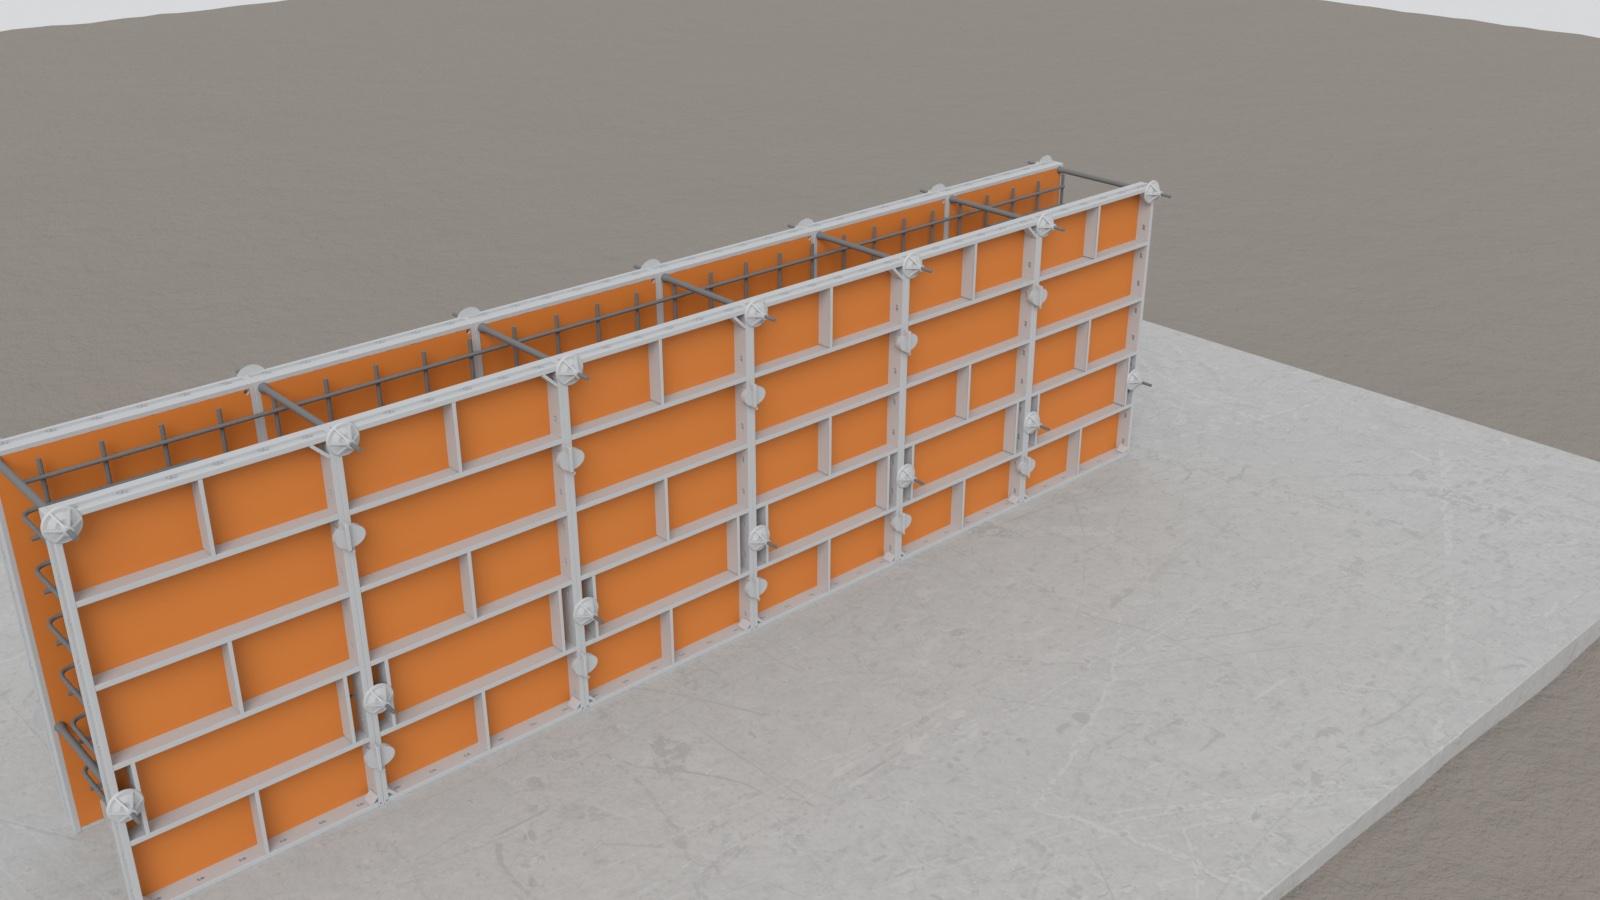
Coat the panels for the second face with release agent, and stand the first one opposite the start of the first face. Tie it to the first face. In our example, the ties hold the second face in place, so it does not need props. Depending on the design, though, some formwork is propped on both faces.
Each tie is a 15mm steel rod that passes through holes in the panels on both faces. It runs inside a plastic sleeve, and a super plate, a combined nut and large washer, is tightened onto each end against the panels. The sleeve stops the rod sticking in the concrete, so you can pull it out after the formwork comes down. Put a tie through every tie hole that a super plate does not cover, and where two panels of different widths meet, tie through the wider panel.
Continue panel by panel, clamping each one to its neighbour and tying it through before standing up the next. Close any tie holes you are not using with Frami frame hole plugs.
Step 7: Close Off the Ends of the Wall
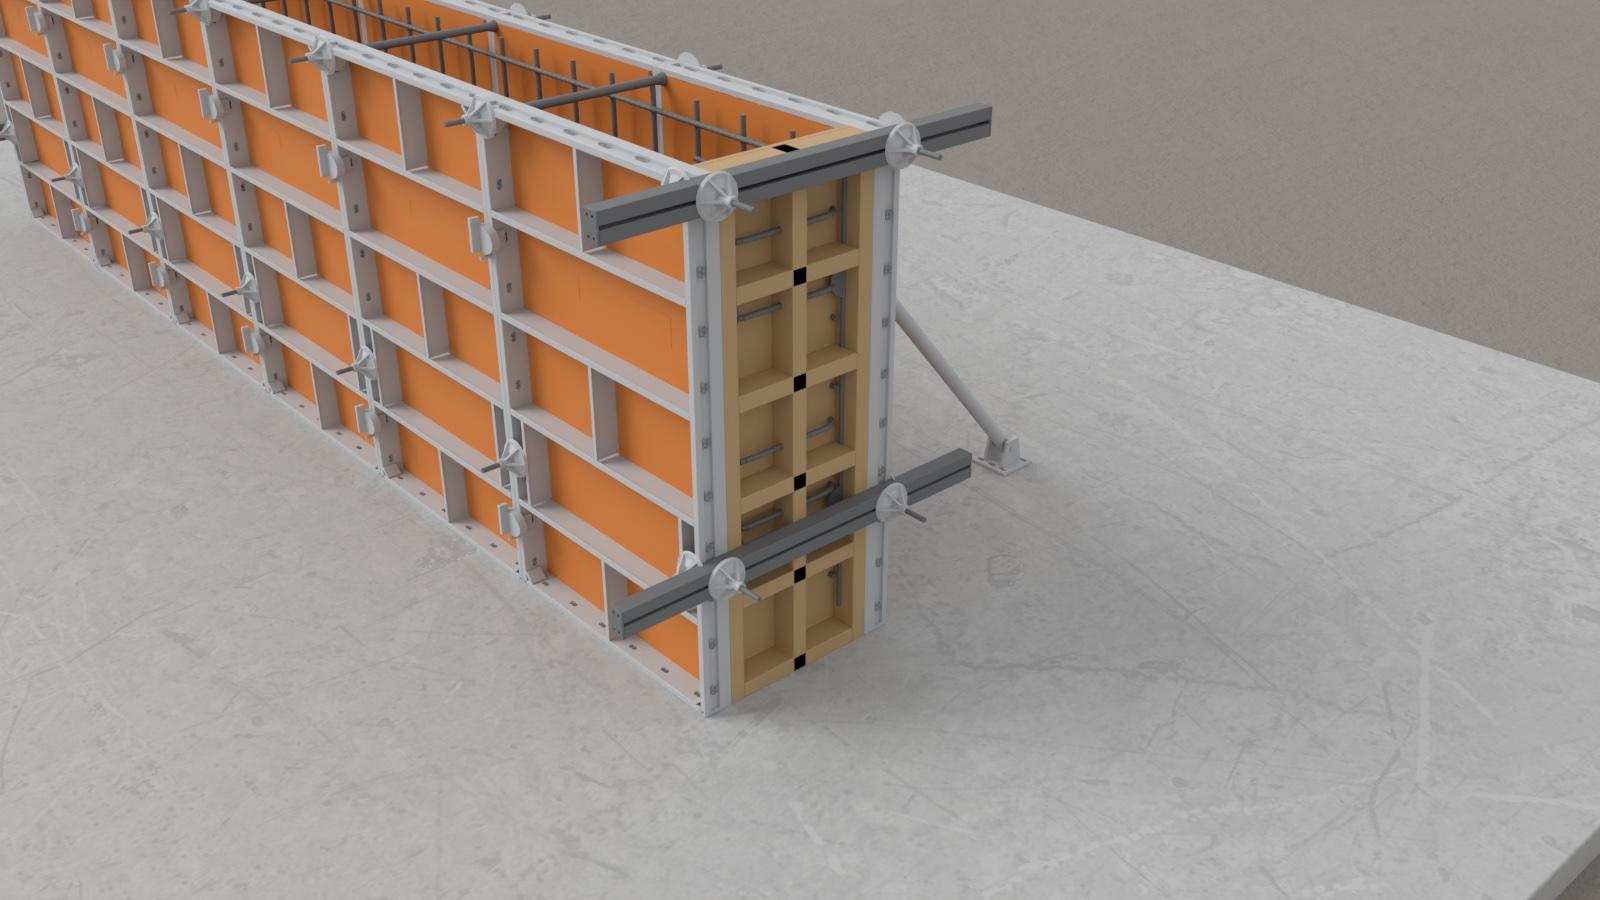
Each open end of the formwork needs closing off so the concrete cannot run out. This closed end is called a stop end. On our example wall, the end is closed with timber cut to the thickness of the wall. Short steel beams called Frami walers run across the outside of the timber and bolt to both faces with universal fixing bolts and super plates, holding the timber in place against the pressure of the concrete.
You can also close the end with a 0.75m Frami universal panel, which has a row of holes that lets it fit walls up to 55cm thick. A 1.50m universal panel needs six universal fixing bolts with super plates to hold it.
Stacking Panels for Taller Walls
For a wall taller than one panel, Frami panels can be stacked on top of each other. Join the horizontal joint between the lower and upper panels with Frami clamps, in the positions shown in Doka's manual. For 1.20m and 1.50m panels, Doka's manual shows the clamps alone are enough up to a formwork height of 3.00m. Above that, it adds steel walings or aligning clamps across the joints.
Stacked panels are rated to a lower concrete pressure than single panels (see Pouring the Concrete), and the props usually connect higher up, on the upper panel. Doka's manual describes assembling taller sections lying flat and lifting them into place by crane (see Lifting by Crane).
On taller walls, where you cannot reach the top of the formwork from the ground, pour from an access platform. Hang Frami access brackets on the propped face, lay scaffold boards across them, and fit toeboards and guardrails, with a guardrail along the top of the second face too. Nobody should step onto the platform until it has guardrails all round.
Pouring the Concrete
Before the concrete pour, check that every clamp and tie is in place, that the props are tight and that both faces are upright.
Wet concrete pushes outwards on the formwork, and the faster you fill it, the harder it pushes. Fill the formwork no faster than the rate calculated for your wall, which keeps that pressure within the limits Doka gives for the panels in use:
| Frami Xlife panels | Permitted fresh-concrete pressure |
|---|---|
| Stacked panels, or panels 0.90m wide | 40kN/m² |
| Panels up to 0.75m wide | 50kN/m² |
| Panels up to 0.60m wide | 60kN/m² |
| Panels up to 0.45m wide | 70kN/m² |
| 3.00m panels, for pours up to 3.00m high | 60kN/m² |
Use a poker vibrator to settle the concrete, but only moderately, and plan where and for how long you use it. Immediately after the pour, wash any concrete off the back of the panels with plain water.
Striking the Formwork
Leave the formwork in place until the concrete has had the time calculated for your job to gain strength.
Start with the second face, taking the panels down one at a time. Take out the ties, remove the clamps to the next panel and lift the panel away. Take down the propped face the same way, keeping the props on until each panel comes off. Plug the plastic sleeves left in the wall.
Clean each panel as soon as it comes off the wall with a high-pressure washer and a concrete scraper. Do not use chemical cleaners.
Lifting by Crane
You can clamp panels together into larger sections on a flat area and lift them into place with a crane, using Frami lifting hooks. Doka rates each hook to carry 500kg, with a sling angle of up to 30°.
Never lift panels by the handles built into them, which are for carrying by hand only.
Safety Points
- Keep the formwork propped or tied at every stage, from the first panel until it comes down.
- Before high winds, at the end of the day and before long breaks, stop the formwork tipping over by putting up the second face, standing it against a wall or fixing it to the ground with Frami floor fixing plates.
- Do not climb on the bars across the back of the panels. They are not a ladder.
- Do not use the panel handles as lifting points.
- When lifting by crane, position the Frami lifting hooks so they cannot slide from side to side, for example over the joints between panels.
- If a face has its platform fitted but the second face is not up yet, fix it to the ground, for example with Frami floor fixing plates, so it cannot be dislodged.
- Never weld or heat tie rods, and take damaged or corroded tie rods out of use.
- Keep off the platform until guardrails are in place all round it, or wear a fall-arrest harness.
- Do not fill the formwork faster than the rate worked out for your wall.
- Contact SEL if any part of the job differs from what the wall was designed for.
- This guide and its figures are an example for illustration only. It remains your responsibility to make sure your Frami formwork is designed, set up and used safely and correctly.